
Google Analytics is a powerful tool for tracking and analyzing website performance. It provides detailed insights into website traffic, user behavior, and more.
With the release of Google Analytics 4, or GA4, the process of setting up and tracking your website’s analytics has become even easier. In this blog post, we’ll walk you through how to set up Google Analytics 4 on your website in four easy steps!
4 steps for GA4 setup:
- Create a Google Analytics Account
- Generate Your GA4 Tracking Code
- Add Your GA4 Code to Your Website
- Customize Your GA4 Dashboard
Step 1: Create a Google Analytics Account
Start by signing in to your Google Analytics account, or create an account if you’re new to the world of analytics. To create a Google Analytics account for the first time, go to google.com/analytics and click “Get started today”. You’ll be asked to provide basic information about your business and website.
Note: If you already have an account set up, you may be automatically logged in or need to click “Sign in to Analytics”.
Once you complete this step, you’ll gain access to your analytics dashboard. Then, you can set up your tracking code!
Step 2: Generate Your Tracking Code
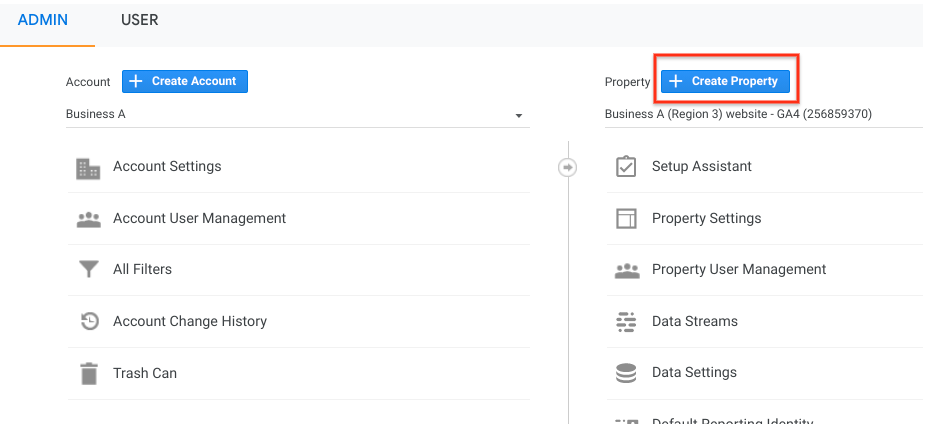
Once you create an account, you must generate a tracking code for your website. To do this, click on “Admin” in the left-hand menu and then click “Create Property.“
After following the steps to create your property, in the “Property” column, click “Data Streams” and then “Add Stream.“
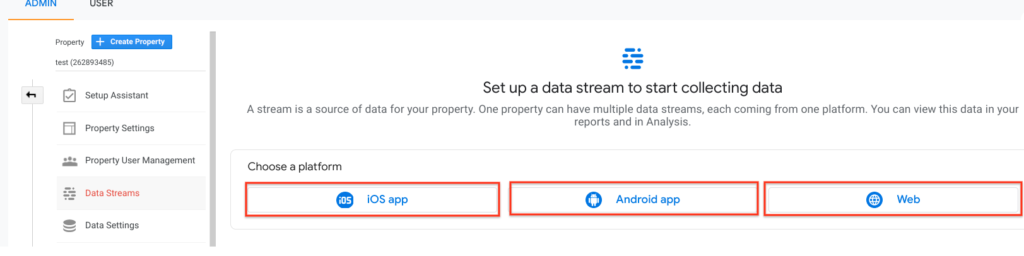
Select “Web” and enter your website’s URL. After completing this setup, click “Create Stream.”
Then, you will then be provided with a unique tracking code that needs to be added to your website for it to be tracked by GA4.
Step 3: Adding GA4 Codes to HTML
Now that you have generated a tracking code, you need to add it to your website. Embedding this tracking code on your website allows GA4 to collect data.
Depending on your website platform (e.g. WordPress), there are different ways to add your tracking code.

Usually, you will have to add the code to the header or footer of your website’s HTML source code file(s). You may have to do this manually, however, many common CMS have a place to insert the tracking code easily.
Once this is done, save any changes and check your Google Analytics dashboard after 24 hours. It can take some time for data collection to begin after adding a new tracking code, which is why you won’t see result straight away. If you don’t see data collected after 24 hours, that’s a good indication that something went wrong.
Step 4: Customize Your Settings & Goals
Once data collection has begun, you can customize your settings and goals to gather meaningful insights from your data. To do this, click on “Customization” in the left-hand menu and select “Custom Reports” from the drop-down menu that appears.
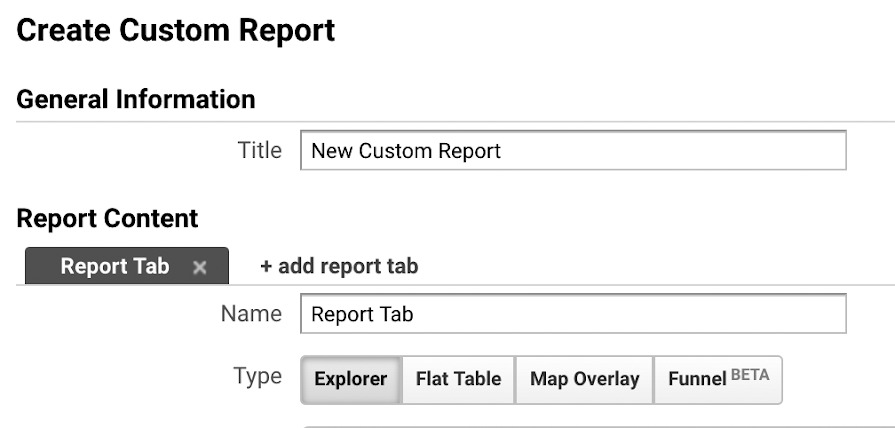
Then, add a “Report Tab” and click “Add Filter” to limit the report to specific dimensions of your analytics.
Here, you can create custom reports and set up goals, such as page views per session or time spent onsite. This will help give you an indication of how successful your site is at achieving its objectives (e.g. increasing sales).
You can also configure other settings, such as filters, which will allow you to exclude certain types of traffic from being included in reports (e.g. internal traffic).
Now that you know how to set up Google Analytics 4, you can use this data to measure the success of your marketing and web design. To learn more about Google Analytics, organic traffic, and more, visit our resources page.